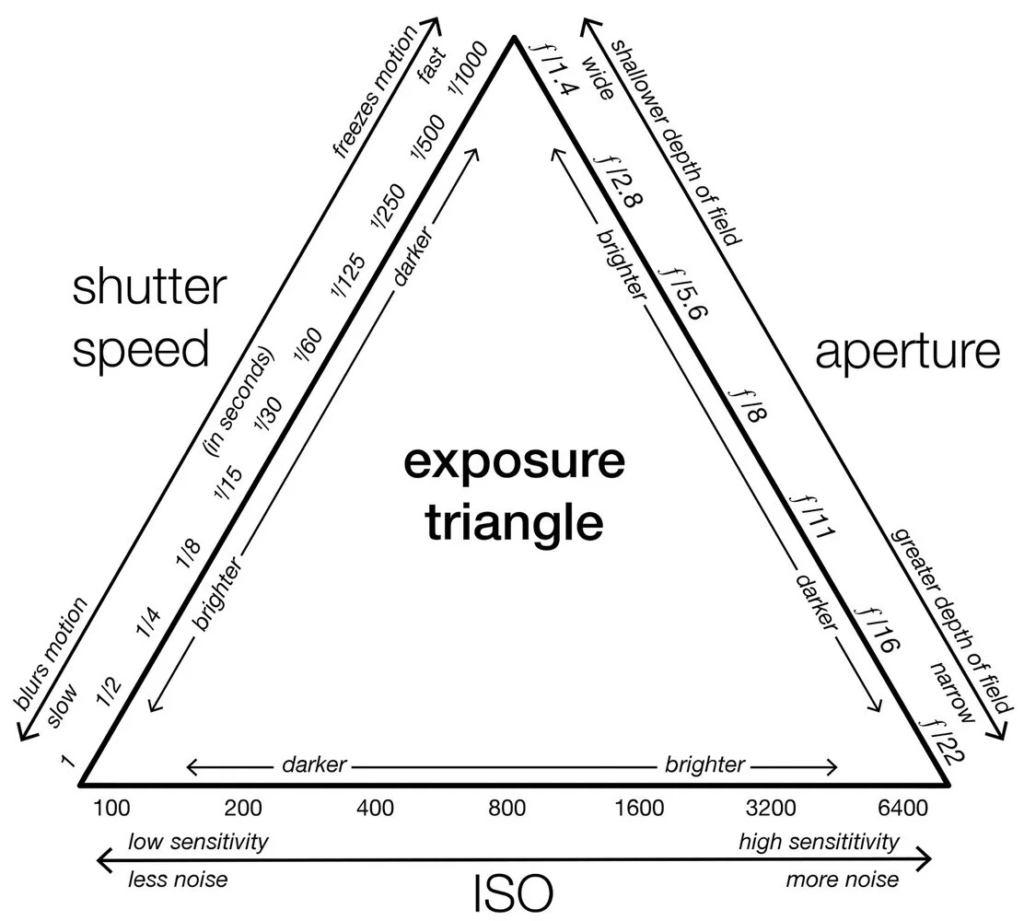
Taking photos indoors can be challenging because there is usually less light than outdoors. This can lead to blurry images, high ISO noise, incorrect exposure and inaccurate colours.
The good news is that you don’t need expensive equipment to get better indoor photographs. With the right camera settings and a little understanding of light, you can produce sharp and well-exposed images.
Start With These Indoor Camera Settings
As a general starting point for indoor photography, try:
- Shooting mode: Manual or Aperture Priority
- Shutter speed: 1/125s or faster for people
- Aperture: f/1.8–f/2.8 for portraits
- ISO: 400–1600 depending on available light
- White balance: Auto or manually set
- Focus: AF-S for stationary subjects, AF-C for moving subjects
- File format: RAW if you plan to edit heavily
These aren’t fixed rules. You should adjust them depending on your subject and lighting.
1. Use a Wide Aperture
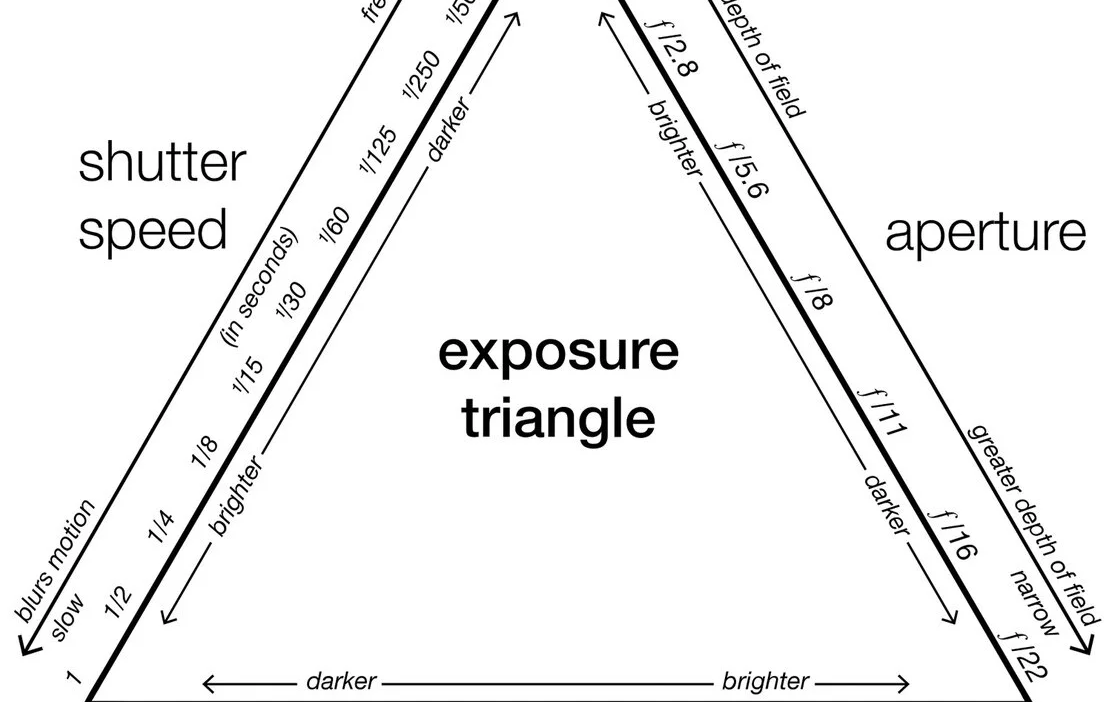
One of the easiest ways to deal with low indoor light is to use a wider aperture.
For example:
f/1.8
f/2
f/2.8
A wider aperture allows more light to reach the camera sensor.
It can also create background blur, which is useful for portraits.
If you’re using a 35mm f/1.7 or f/1.8 lens, for example, you have a significant advantage over a slower kit lens in dark indoor environments.
However, remember that wider apertures produce a shallower depth of field.
If you’re photographing several people, you may need to stop down to around f/4 or f/5.6.
2. Don’t Let Your Shutter Speed Get Too Slow
A common mistake when shooting indoors is allowing the shutter speed to become extremely slow.
Your camera may be able to capture enough light at:
1/30s
but if your subject is moving, the photograph may still be blurry.
For indoor portraits, 1/125s is a useful starting point.
For moving subjects, you may need:
1/250s
or faster.
If you’re photographing a completely stationary object from a tripod, you can use much slower shutter speeds.
3. Increase ISO When Necessary
ISO controls the camera’s sensitivity to light.
When your indoor scene is too dark, increasing ISO allows you to maintain a usable shutter speed.
For example, you might use:
ISO 400 in a bright room.
ISO 800–1600 in a moderately lit room.
ISO 3200 or higher in a very dark environment.
Higher ISO can introduce digital noise, but a slightly noisy, properly exposed photograph is often better than a severely underexposed or blurry image.
Don’t be afraid of ISO.
Learn how much noise your particular camera can handle and expose accordingly.
4. Use the Right Focus Mode
Your focus mode should match your subject.
For stationary subjects, AF-S can be a good choice.
For moving people, AF-C is usually more appropriate.
If your camera has Eye AF, it can be particularly useful for indoor portraits.
When shooting at f/1.8, accurate focusing becomes even more important because your depth of field can be very shallow.
5. Pay Attention to White Balance
Indoor lighting can produce very different colours.
For example, a room may have:
- Warm tungsten bulbs
- Cool LED lights
- Fluorescent lighting
- Window light
- Coloured decorative lights
If your white balance is incorrect, skin tones can appear too orange, blue or green.
Auto White Balance can work well in many situations, but manually setting your white balance can provide more consistent results.
If you’re shooting RAW, you also have much more flexibility to correct white balance during editing.
6. Use Window Light
You don’t always need artificial lighting.
A large window can provide excellent natural light for indoor portraits.
Position your subject near the window and experiment with their direction.
Try having the person:
- Face the window
- Turn slightly toward it
- Stand perpendicular to it
- Stand with the window behind them
Each position creates a different look.
Window light can be particularly flattering when the sunlight isn’t directly hitting the subject.
7. Avoid Mixing Too Many Light Sources
Mixed lighting can make colour correction difficult.
For example, imagine your subject is standing beside a window while a warm yellow bulb illuminates the other side of their face.
You may end up with one side looking cool and the other side looking orange.
When possible, try to control the lighting.
You can turn off unnecessary lights or position your subject so that one dominant light source is doing most of the work.
8. Use Exposure Compensation When Shooting Aperture Priority
Aperture Priority can be extremely useful indoors.
You choose the aperture, while the camera chooses the shutter speed.
For example:
Aperture: f/2
Then monitor the shutter speed.
If the camera chooses a shutter speed that’s too slow, increase the ISO or adjust your settings.
You can also use exposure compensation if the camera is making the image too bright or too dark.
9. Shoot in RAW
If you plan to edit your photographs, RAW is usually the better choice.
RAW files retain significantly more image information than compressed JPEG files, giving you greater flexibility when adjusting:
- Exposure
- White balance
- Shadows
- Highlights
- Colour
- Contrast
This can be particularly useful for indoor photography where exposure can be challenging.
The downside is that RAW files are larger and require editing before they’re ready to share.
10. Use a Tripod for Static Subjects
If your subject isn’t moving, a tripod can make indoor photography much easier.
A tripod allows you to use a slower shutter speed without introducing camera shake.
This is useful for:
- Interior photography
- Product photography
- Architecture
- Food photography
- Still life
- Long exposures
However, a tripod won’t prevent a moving person from becoming blurry.
If your subject is moving, you still need a sufficiently fast shutter speed.
11. Use Flash When Necessary
There’s nothing wrong with using flash indoors.
A flash can provide additional light when the room is too dark.
However, pointing the flash directly at someone’s face can produce harsh shadows and an unnatural appearance.
If your flash supports bouncing, try bouncing it off a suitable ceiling or wall.
This can create a much softer appearance.
Always consider the colour and height of the surface you’re bouncing from because it can affect the colour of the light.
12. Don’t Underexpose Just to Keep ISO Low
One common beginner mistake is refusing to increase ISO because they’re afraid of noise.
For example:
“I don’t want to go above ISO 800.”
They then underexpose the image heavily.
During editing, they brighten the photograph and discover that the image contains even more visible noise and poor shadow detail.
It’s often better to capture a properly exposed image at a reasonable ISO than to severely underexpose it.
13. Move Your Subject Closer to the Light
If the room is dark, don’t immediately change your camera settings.
Try moving the subject.
Place them closer to:
- A window
- A doorway
- A lamp
- A softbox
- An LED light
Even moving a person a small distance toward a light source can make a noticeable difference.
14. Watch Your Background
Indoor photographs often contain distracting objects.
Before pressing the shutter, check what’s behind your subject.
Look for:
- Clutter
- Cables
- Furniture
- Bright windows
- Random objects
- Distracting colours
A clean background can make an indoor photograph look much more professional.
Sometimes simply moving the camera a few steps can dramatically improve the composition.
15. Try These Settings for Indoor Portraits
If you’re photographing one person indoors, start with:
Mode: Manual
Aperture: f/1.8–f/2.8
Shutter: 1/125s
ISO: 400–1600
Focus: Eye AF or AF-C
White balance: Auto or manual
Then adjust the ISO according to the available light.
If the subject is moving, increase your shutter speed.
If the image is too dark, increase ISO or add light.
Indoor Settings for Different Situations
| Situation | Aperture | Shutter | ISO |
| Bright indoor portrait | f/2.8 | 1/125s | 200–800 |
| Normal indoor portrait | f/1.8–f/2.8 | 1/125s | 400–1600 |
| Dark reception | f/1.7–f/2 | 1/100–1/125s | 1600–6400+ |
| Indoor product photography | f/4–f/8 | Adjust as needed | 100–800 |
| Indoor group photo | f/4–f/5.6 | 1/125s | 400–1600 |
| Static interior | f/5.6–f/8 | Adjust as needed | Low ISO |
These are starting points, not strict rules.
Common Indoor Photography Mistakes
Using a Slow Shutter Speed
This can cause motion blur and camera shake.
Keeping ISO Too Low
A low ISO isn’t useful if it forces you to severely underexpose the photograph.
Using the Wrong White Balance
Mixed indoor lighting can create strange skin tones.
Shooting Everything at f/1.8
A very wide aperture isn’t always appropriate, particularly for groups.
Ignoring the Light
Changing your subject’s position can sometimes improve the photograph more than changing your camera settings.
Forgetting to Check Focus
Always check that the important part of your subject is actually sharp.
Final Thoughts
Indoor photography becomes much easier once you understand how to balance aperture, shutter speed and ISO.
Start with a wide aperture to let in more light, maintain a fast enough shutter speed to prevent blur and increase ISO when necessary.
Don’t forget that camera settings are only part of the equation.
Good light + good composition + correct focus + appropriate settings = better indoor photographs.
And if the room is simply too dark, don’t fight your camera unnecessarily. Add light, move your subject closer to a window or use a fast lens.
Frequently Asked Questions
What is the best ISO for indoor photography?
There isn’t one universal ISO. Start as low as practical and increase it enough to maintain proper exposure and a usable shutter speed.
What shutter speed should I use indoors?
For portraits, around 1/125s is a useful starting point. Moving subjects may require 1/250s or faster.
What aperture is best for indoor portraits?
A wide aperture such as f/1.8–f/2.8 is a useful starting point because it allows more light into the camera.
Should I use flash for indoor photography?
You can. Flash can be extremely useful when natural or available light isn’t sufficient. Bouncing the flash can produce softer results than pointing it directly at the subject.
Is RAW better than JPEG for indoor photography?
RAW generally provides more flexibility when correcting exposure and white balance during editing, making it particularly useful when indoor lighting is difficult.
Why are my indoor photos blurry?
The most common causes are a shutter speed that’s too slow, camera shake or subject movement. Increasing shutter speed and/or ISO can help.
How can I improve indoor photos with out buying new equipment?
Use window light, move your subject closer to available light, clean up the background, choose a suitable aperture and carefully control your exposure.