Getting great portrait photos isn’t only about having an expensive camera or an expensive lens. Your camera settings have a major effect on how sharp your subject looks, how much background blur you get, and how natural the final image looks.
If you’re a beginner and you’re wondering what settings to use for portrait photography, don’t worry. You don’t need to understand every camera setting before you start.
In this guide, I’ll explain the most important portrait settings and give you practical starting points for outdoor portraits, indoor portraits, studio photography and group photos.
Quick Answer: What Are the Best Camera Settings for Portrait Photography?
As a starting point for a single-person portrait, try:
- Aperture: f/1.8–f/2.8
- Shutter speed: 1/125s or faster
- ISO: 100–400 outdoors
- Focus: Eye AF or single-point autofocus
- File format: RAW if you’re editing the photos
- White balance: Auto is fine when you’re starting
- Drive mode: Single shot for posed portraits
These aren’t fixed rules. Your lighting, lens, subject and desired look will determine the final settings.
For example, you may need a higher ISO indoors or a faster shutter speed when photographing someone who is moving.
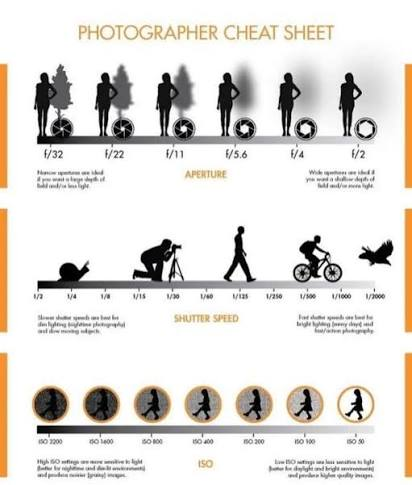
Understanding the Three Most Important Camera Settings
Before worrying about complicated camera menus, learn these three settings:
Aperture + Shutter Speed + ISO
Together, they control exposure and have a major effect on how your portrait looks.
1. Aperture
Aperture controls how much light enters your lens and how much of the scene appears in focus.
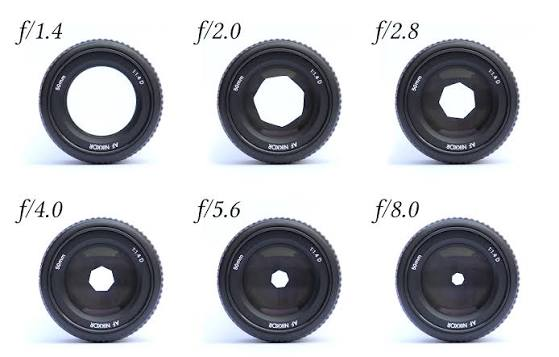
It’s represented by numbers such as:
- f/1.4
- f/1.8
- f/2
- f/2.8
- f/4
- f/5.6
- f/8
The confusing part for beginners is that a smaller f-number means a wider aperture.
For example:
f/1.8 = wide aperture
f/8 = narrow aperture
What aperture should you use for portraits?
For a single-person portrait where you want a blurry background, start around:
f/1.8–f/2.8
A wide aperture can separate your subject from the background and create attractive background blur.
However, don’t automatically shoot every portrait at the widest aperture your lens allows.
If you’re using f/1.4 or f/1.8 and your subject isn’t positioned properly, you may find that part of the face is sharp while another important part is noticeably out of focus.
For example, if you’re shooting a close-up portrait, the eyes may be sharp while the ears or other parts of the face fall outside the depth of field.
When should you use f/4 or f/5.6?
Use a narrower aperture when you want more of the subject or scene to remain in focus.
This can be useful for:
- Couples
- Small groups
- Environmental portraits
- Full-body portraits
- Portraits where the background is important
For group portraits, f/4–f/5.6 can be a safer starting point because multiple people may not be on exactly the same focal plane.
2. Shutter Speed
Shutter speed controls how long your camera’s sensor is exposed to light.
It also affects motion blur.
If your shutter speed is too slow while your subject is moving, your portrait can look soft even if your focus was correct.
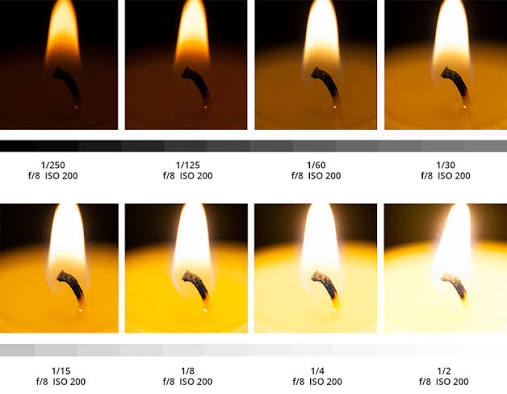
For a stationary portrait, a good starting point is:
1/125s
If your subject is moving, try:
1/250s or faster
For children or active subjects, you may need:
1/500s or faster
The exact shutter speed depends on the movement and your focal length.
Canon’s portrait guidance similarly recommends keeping handheld shutter speeds sufficiently fast to avoid camera shake and increasing shutter speed for moving subjects.
Don’t sacrifice sharpness just to keep ISO low
One common beginner mistake is being afraid of increasing ISO.
For example, imagine you’re shooting indoors at:
ISO 100
f/2
1/60s
The photo may look bright, but if your subject moves slightly, you can end up with motion blur.
It can be better to use:
ISO 800
f/2
1/125s
A little extra noise is usually preferable to a blurry portrait.
3. ISO
ISO controls how sensitive the camera is to light.
In general, start with a low ISO when you have plenty of light.
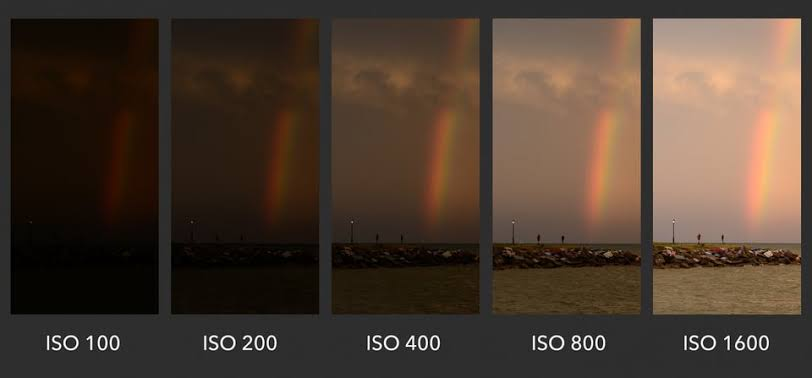
For outdoor portraits, you might use:
ISO 100–200
For indoor portraits:
ISO 400–1600
In very dark environments, you may need to go even higher.
Higher ISO can introduce more visible noise, so don’t increase it unnecessarily. But modern cameras can handle higher ISO values better than many older cameras, and getting the shot sharp is often more important than keeping ISO extremely low.
Best Camera Settings for Outdoor Portrait Photography
Outdoor portraits are usually easier because you have more available light.
A good starting setup is:
Aperture: f/2–f/2.8
Shutter speed: 1/250s or faster
ISO: 100–400
Focus: Eye AF
White balance: Auto or Daylight
File format: RAW
If you’re shooting under strong sunlight, your shutter speed may need to become much faster.
For example:
f/2
1/1000s
ISO 100
could be perfectly reasonable in bright outdoor conditions.
The important thing is to check your exposure rather than blindly copying someone else’s settings.
Best Settings for Golden Hour Portraits
Golden hour can be one of the easiest times to create beautiful portraits because the sunlight is softer and warmer.
Try:
Aperture: f/1.8–f/2.8
Shutter speed: 1/250s or faster
ISO: 100–400
White balance: Auto or Daylight
You can position your subject so that the sunlight comes from behind or slightly to the side.
This can create a warm glow around the subject while keeping the face nicely separated from the background.
If you’re using a wide-aperture lens, keep an eye on your highlights because bright sunlight can easily overexpose the background.
Best Camera Settings for Indoor Portrait Photography
Indoor photography usually gives you less light, so you need to balance aperture, shutter speed and ISO carefully.
A good starting point is:
Aperture: f/1.8–f/2.8
Shutter speed: 1/125s
ISO: 400–1600
If you’re using a window as your main light source, position your subject near the window and adjust your camera settings based on the available light.
If the image is too dark, you can:
- Open the aperture.
- Increase ISO.
- Add artificial lighting.
- Move the subject closer to the light.
Don’t immediately reduce your shutter speed to something extremely slow.
Best Settings for Studio Portrait Photography
Studio photography is different because you have much more control over the light.
If you’re using strobes or flashes, your camera settings will depend on the lighting equipment and your camera’s flash-sync limitations.
A common starting point could be:
Aperture: f/5.6
Shutter speed: around 1/160–1/200s
ISO: 100
Then adjust your lighting power and aperture to achieve the look you want.
If you’re using continuous lights instead of flash, you have more flexibility with shutter speed.
Best Settings for Group Portraits
Group portraits require a different approach from single-person portraits.
You don’t necessarily want to shoot a large group at f/1.8 because the shallow depth of field can make some people fall out of focus.
Try:
Aperture: f/4–f/5.6
Shutter speed: 1/125s or faster
ISO: Adjust according to available light
Focus: Eye/face AF or a suitable focus point
Also try to keep the people relatively close to the same distance from the camera.
The more spread out your subjects are in depth, the more important your depth of field becomes.
Best Focus Settings for Portrait Photography
Getting the exposure right is important, but focus is critical.
If your camera has Eye AF, use it.
Modern mirrorless cameras can detect and track a person’s eye, making portrait photography considerably easier.
For a stationary subject, you can use:
AF-S / Single AF
For a moving subject:
AF-C / Continuous AF
If your camera doesn’t have reliable Eye AF, use a single autofocus point and place it over the subject’s nearest eye.
Why should you focus on the eye?
The eyes are usually one of the most important areas of a portrait.
If the eyes are soft, the entire photograph can feel out of focus even if other parts of the face are sharp.
RAW or JPEG for Portrait Photography?
If you plan to edit your portraits, I recommend shooting RAW when your camera and workflow support it.
RAW files retain significantly more information for editing compared with JPEG files.
This gives you more flexibility when adjusting:
- Exposure
- Highlights
- Shadows
- White balance
- Skin tones
- Colour
- Contrast
JPEG is convenient when you need finished files quickly, but RAW is generally preferable when you want more control during post-production.
Best White Balance for Portraits
White balance affects the colour temperature of your photographs.
If your white balance is wrong, skin can appear too blue, too yellow or otherwise unnatural.
For beginners, Auto White Balance is usually a convenient starting point.
You can also use fixed white-balance settings such as:
- Daylight
- Cloudy
- Shade
- Tungsten
If you’re shooting under controlled studio lighting, manually setting your white balance can help maintain consistent colour.
Should You Use Manual Mode for Portrait Photography?
You don’t have to use Manual Mode to take good portraits.
If you’re still learning, Aperture Priority can be extremely useful.
You choose the aperture, while the camera selects a shutter speed based on its exposure measurement.
For example:
Aperture Priority
f/2.8
ISO 100–400
can be a very simple setup for outdoor portraits.
Once you’re comfortable with exposure, switching to Manual Mode gives you greater control and consistency, particularly when you’re working with controlled lighting.
Portrait Camera Settings Cheat Sheet
| Situation | Aperture | Shutter Speed | ISO |
|---|---|---|---|
| Outdoor portrait | f/1.8–f/2.8 | 1/250s+ | 100–400 |
| Golden hour | f/1.8–f/2.8 | 1/250s+ | 100–400 |
| Indoor portrait | f/1.8–f/2.8 | 1/125s+ | 400–1600 |
| Studio portrait | f/4–f/8 | 1/160–1/200s* | 100 |
| Group portrait | f/4–f/5.6 | 1/125s+ | 100–800 |
| Moving subject | f/2–f/4 | 1/250–1/500s+ | Adjust as needed |
*When using flash, stay within the appropriate sync speed for your camera and lighting system.
These are starting points, not universal rules. Your lighting and equipment will determine the final settings.
What Settings Should a Beginner Use?
If you’re completely new to portrait photography, don’t try to memorize everything.
Start with this:
Outdoor
f/2.8
1/250s
ISO 100
Indoor
f/2
1/125s
ISO 800
Then look at your photograph.
If it’s too dark, increase ISO or add light.
If there’s motion blur, increase shutter speed.
If you want more background blur, open your aperture.
If too much of the scene is out of focus, close your aperture slightly.
This simple approach will teach you much faster than memorizing a single “perfect” setting.
A Practical Tip for Better Portraits
Your camera settings are only one part of getting a great portrait.
Lighting, posing, composition, lens choice and your interaction with the subject can make an equally big difference.
For example, moving your subject a few metres away from a distracting background can create much better separation even if you don’t change your camera settings.
Similarly, changing the position of your subject relative to a window can completely change the appearance of the portrait.
Don’t spend the entire shoot staring at your camera screen.
Talk to your subject.
Give them directions.
Move around.
Look for better light.
Then adjust your settings as the situation changes.
Final Thoughts
There is no single set of camera settings that works for every portrait.
However, if you understand aperture, shutter speed and ISO, you can quickly adjust your camera to almost any situation.
For a typical single-person portrait, start around f/1.8–f/2.8, keep your shutter speed fast enough to prevent motion blur, and use the lowest ISO that still gives you a properly exposed and sharp photograph.
Most importantly, don’t be afraid to experiment.
Take the same portrait at f/1.8, f/2.8, f/4 and f/5.6. Compare the background, sharpness and overall look.
That’s one of the fastest ways to understand how your camera settings actually affect your photographs.
Frequently Asked Questions
What is the best aperture for portrait photography?
For a single-person portrait, f/1.8–f/2.8 is a useful starting range when you want a blurred background. For groups, f/4–f/5.6 can provide more depth of field.
What shutter speed should I use for portraits?
Start around 1/125s for a relatively still subject. Increase to 1/250s or faster when your subject is moving.
What ISO is best for portrait photography?
Use the lowest ISO that gives you enough light and a fast enough shutter speed. ISO 100–400 is common outdoors, while indoor portraits may require ISO 400–1600 or higher depending on the lighting.
Should I shoot portraits in RAW?
Yes, if you intend to edit your photographs. RAW gives you considerably more flexibility during post-processing.
Should I use Eye AF for portraits?
If your camera has reliable Eye AF, it is an excellent option for portrait photography because it helps keep the subject’s eyes in focus.
Is f/1.8 always better for portraits?
No. A wider aperture creates more background blur but also gives you a shallower depth of field. Sometimes f/2.8, f/4 or even f/5.6 can produce a better result depending on the subject and composition.
What is the best camera mode for beginners?
Aperture Priority is a useful starting point because you can control depth of field while the camera handles shutter speed. Manual Mode becomes more useful as you become comfortable controlling exposure.