
Photography can look simple from the outside. You point a camera or phone at a subject, press the shutter button, and get a picture. However, creating consistently good photographs requires more than simply knowing how to operate a camera.
Beginners often make small mistakes that affect sharpness, lighting, composition, and overall image quality. The good news is that most of these mistakes are easy to correct once you know what to look for.
1. Shooting Without Checking the Light
Harsh or Poor Lighting Can Ruin a Good Photo
One of the biggest mistakes beginners make is paying attention to the subject but ignoring the light.
Even an interesting subject can look unattractive when the lighting is poor. Harsh sunlight can create strong shadows, while insufficient light can introduce noise and make photographs look soft.
Before taking a photo, look at where the light is coming from and how it falls on your subject.
Look for Soft, Directional Light
When photographing people, soft light is often easier to work with. Open shade, large windows, and overcast skies can provide flattering illumination.
Instead of immediately taking the picture, move your subject or yourself until you find a better lighting position.
2. Using the Wrong Shutter Speed
Slow Shutter Speeds Can Cause Blur
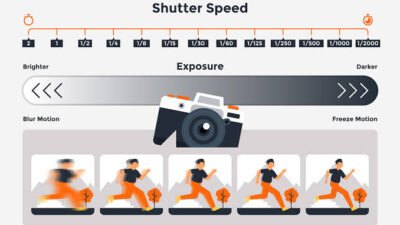
If your shutter speed is too slow while photographing a moving person or object, the subject may appear blurry.
This is especially common when beginners photograph weddings, sports, children, or other moving subjects.
A faster shutter speed can help freeze movement and produce sharper results.
Match Your Shutter Speed to the Situation
The appropriate shutter speed depends on how quickly your subject is moving and whether your camera is handheld.
For example, a stationary subject can usually be photographed at a slower shutter speed than someone walking, dancing, or running.
3. Ignoring Focus
Your Main Subject Should Usually Be Sharp
A beautifully composed photograph can still fail if the important part of the image is out of focus.
When photographing people, pay particular attention to the eyes. For products or objects, focus on the area that contains the most important detail.
Check Your Focus Before Moving On
If you are taking several important photographs, quickly review some of them at full size. This helps you catch focusing problems before you leave the location.
4. Making Every Photo Too Bright
Overexposure Can Remove Important Details
Beginners sometimes increase exposure because they think a brighter photograph automatically looks better.
However, excessive brightness can cause highlights to lose detail. White clothing, skies, windows, and bright lights are particularly vulnerable to overexposure.
Watch Your Brightest Areas
When adjusting exposure, pay attention to the brightest parts of the frame.
A slightly darker image can sometimes be recovered during editing more successfully than an area that has been completely overexposed.
5. Forgetting About the Background
A Distracting Background Takes Attention Away From the Subject
The background is part of your photograph, even when it isn’t the main subject.
Objects, signs, cables, people, and clutter can make an otherwise strong photograph look messy.
Before pressing the shutter button, take a quick look around the edges of the frame.
Change Your Position
You don’t always need to physically move the background.
Moving a few steps to the left or right, lowering your camera, or changing your shooting angle can sometimes remove distractions completely.
6. Taking Every Photo From the Same Angle
Experiment With Your Perspective
Standing in one position and taking every photograph from eye level can make your images feel repetitive.
Try moving around your subject. Photograph from the side, slightly above, slightly below, or from a different distance.
Different perspectives can completely change how a subject appears.
Think About What the Angle Communicates
A low angle can make a subject appear larger or more imposing, while a higher viewpoint can create a different visual feeling.
Choose your angle based on the result you want rather than simply taking the easiest shot.
7. Using Too Much Digital Zoom
Digital Zoom Can Reduce Detail
Many beginners zoom in heavily when they cannot physically get closer to their subject.
Depending on the phone or camera, excessive digital zoom can reduce image detail and make photographs appear soft.
When practical, move closer to your subject or use a suitable optical or telephoto lens.
Know Your Camera’s Different Lenses
Modern smartphones and interchangeable-lens cameras may provide several focal-length options.
Learning what each lens or camera provides will help you choose the right option instead of relying heavily on digital zoom.
8. Shooting Everything in Automatic Mode
Automatic Mode Is Useful, But It Has Limitations
Automatic settings are helpful when you are learning, and there is nothing wrong with using them.
However, relying on automatic settings for every situation can prevent you from understanding how exposure works.
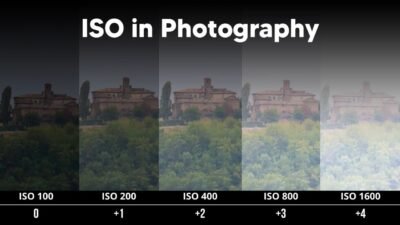
Learning the basics of aperture, shutter speed, and ISO gives you more control over difficult lighting situations.
Learn One Setting at a Time
You don’t need to master every camera setting immediately.
Start by understanding shutter speed, then learn aperture and ISO. Once you understand how they interact, manual shooting becomes much easier.
9. Holding the Camera Incorrectly
Camera Shake Can Reduce Sharpness
Even when your focus is correct, camera movement can make a photograph look soft.
Hold your camera securely and avoid unnecessary movement when pressing the shutter.
For handheld photography, maintaining a stable posture can make a noticeable difference.
Use Support When Necessary
A tripod can be useful for landscapes, portraits, product photography, long exposures, and other situations where you need maximum stability.
You don’t need to use a tripod for every photograph, but knowing when to use one can improve consistency.
10. Editing Too Much
Heavy Editing Can Make Photos Look Unnatural
Editing is an important part of modern photography, but beginners often make the mistake of pushing every adjustment too far.
Excessive saturation, sharpening, contrast, clarity, or skin smoothing can make photographs look artificial.
Make Adjustments With a Purpose
Instead of asking, “How much can I edit this photo?” ask, “What does this photo need?”
A small exposure correction or color adjustment may be all that is necessary.
11. Taking Too Many Photos Without Reviewing Them
More Photos Don’t Always Mean Better Photos
Taking hundreds of photographs without checking them can make it difficult to identify your mistakes.
After a shoot, review your images and look for patterns.
Are your photos consistently too dark? Are you missing focus? Are your compositions too similar?
Learn From Your Failed Photos
Bad photographs can be useful learning tools.
Instead of simply deleting them, try to understand why they didn’t work. This can help you avoid repeating the same mistake during your next shoot.
12. Not Practicing Enough
Photography Improves Through Practice
Reading about photography is useful, but practical experience is what helps you develop your eye.
You can practice with almost anything around you. Photograph people, buildings, food, objects, streets, and everyday situations.
Challenge Yourself With Different Lighting
Don’t only practice when the lighting is perfect.
Try shooting indoors, outdoors, during cloudy weather, around sunset, and in low-light environments.
Every situation teaches you something different.
Final Thoughts
Making mistakes is a normal part of learning photography. The important thing is to recognize those mistakes and understand how to correct them.
Pay attention to your lighting, focus, shutter speed, composition, background, and exposure. Avoid excessive digital zoom and editing, and take time to review your photographs after every shoot.
With regular practice, these technical decisions will gradually become easier and more natural.